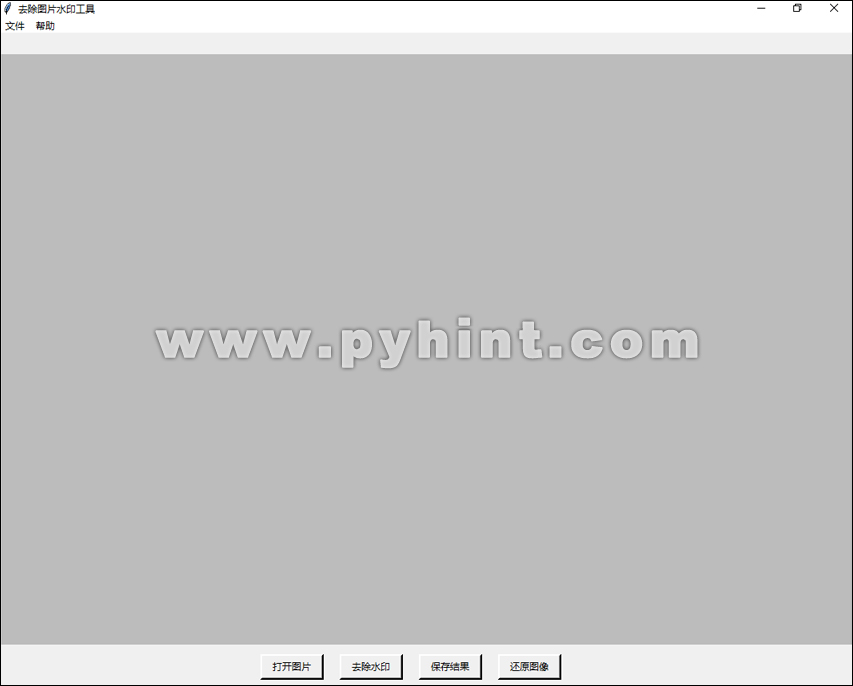
图片中的水印是指在图片上添加的一种特殊标记,这种标记可以是文字、图形、logo标志等。水印通常用于标明图片的版权信息、拍摄者、所有者、使用限制或品牌宣传等相关信息,水印最直接的作用是防止图片被盗用或未经授权使用。在日常工作和生活中,图片水印往往让人感到烦恼,尤其是当我们想要分享转发这些图片或使用这些图片做一些设计时,水印就成了难以跨越的障碍。幸运的是,万能的Python提供了强大的图像处理库,可以用来检测和去除图片中的水印。本节教程将介绍如何通过Python的Tkinter图形界面库设计一个简单的GUI界面,并使用Pillow库打开图片,再使用Python的OpenCV和Numpy库实现去除图片水印功能。
1、去除图片水印工具介绍
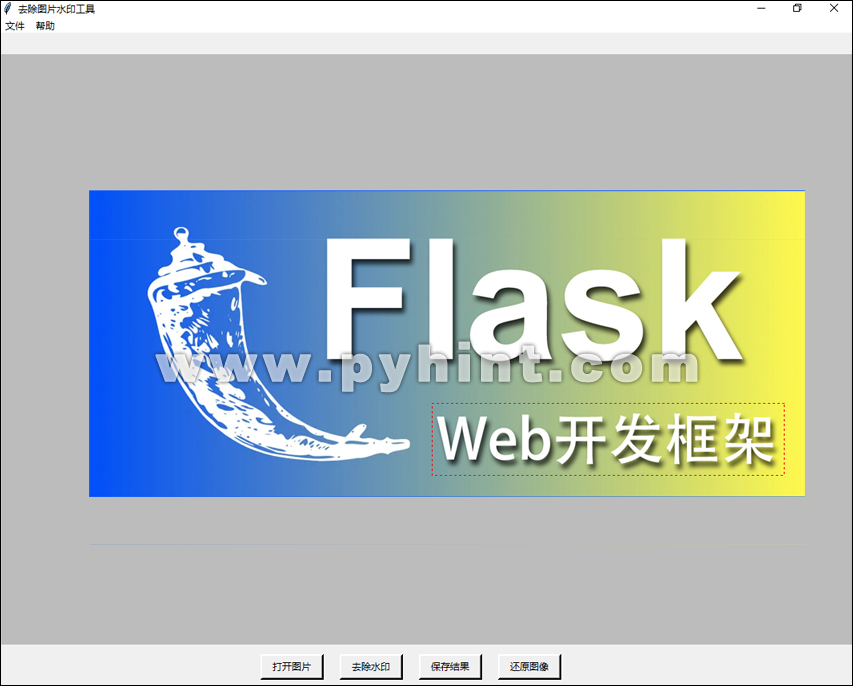
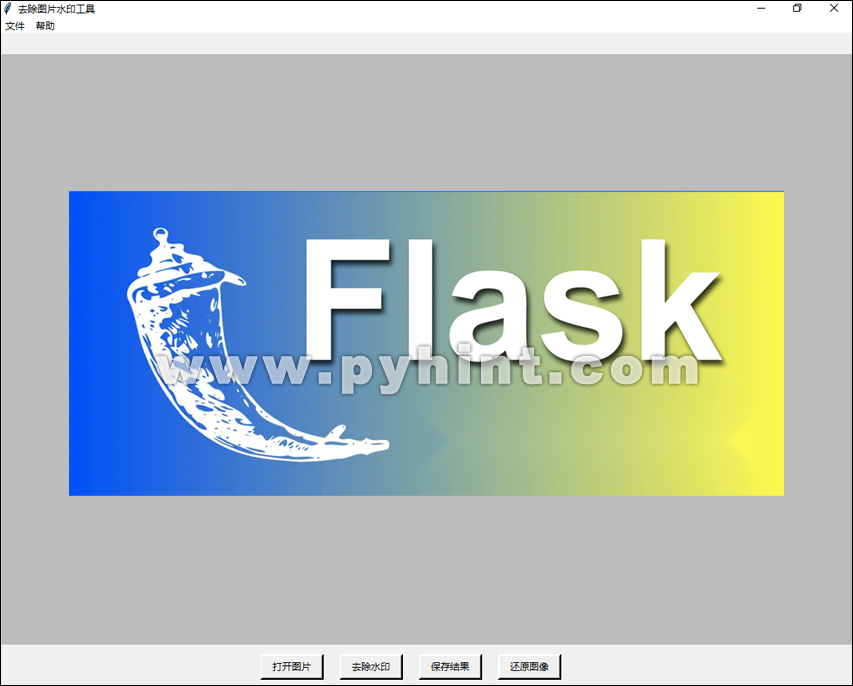
该程序通过Python的Tkinter图形界面库创建一个最大化的操作窗口,允许用户选择图片,通过拖动鼠标选择指定区域的水印,然后点击“去除水印”,并保存到指定文件夹内。
Python去除图片水印设计思路
读取图像:通过Python的第三方图像处理库Pillow处理图像,包括打开、操作和保存图像。
选取水印位置:通过拖动鼠标创建一个红色矩形虚线区域,选择指定的水印区域。按下鼠标开始选中,松开鼠标结束选择,并通过Python的第三方科学计算库NumPy高效处理多维数组和矩阵运算。
填充水印区域:通过Python的第三方图像处理库OpenCV,对选中的水印区域进行像素替换,并对选中区域周围高斯滤波,平滑处理,再对图像做进一步平滑处理。cv2.inpaint()函数是OpenCV库中用于图像修复的核心函数,它通过智能算法填充图像中的指定区域(如划痕、水印、遮挡物等),基于周围像素信息重建被破坏的区域。
注意:在OpenCV中,默认情况下处理的是无透明通道的图像,如果处理的图像是带有透明通道的PNG格式,程序会自动将透明背景转换成白色背景,点击保存图片后,原透明的背景也会自动被替换成白色背景。
2、去除图片水印工具界面演示


3、代码实现
(1)安装Pillow、NumPy和OpenCV库
首先,确保你已经安装了Pillow、NumPy和OpenCV库。如果还没有安装,可以通过pip安装:
pip install Pillow
pip install opencv-python
pip install numpy
其中Pillow库(主流的图像处理库)是Python中最主流的第三方图像处理库,它提供了对多种图像格式的支持与操作功能,可以轻松完成图像打开、裁剪、缩放、旋转、滤镜、绘图、文字添加、格式转换等图像处理任务。OpenCV库是Python中极为重要的第三方库,它提供了大量的工具和功能,帮助开发者实现图像处理、视频分析、脸部识别、物体检测、运动分析等任务。NumPy库是Python中一个运行速度非常快的第三方数学库,支持大量的维度数组与矩阵运算。
(2)去除图片水印工具,完整代码如下所示:
动手练一练:
import tkinter as tk
from tkinter import filedialog, messagebox
import webbrowser
from os import path
from PIL import ImageTk, Image, ImageDraw
import tkinter as tk
import cv2
import numpy as np

# 定义RemoveWatermark类,用于封装程序功能
class RemoveWatermark:
    def __init__(self):
        # 初始化变量
        self.original_image = None
        self.removed_image = None
        self.display_ratio = 1.0
        self.rectangle_selection = None
        self.max_height = 820
        self.mask = None

        self.root = tk.Tk()
        self.root.title('去除图片水印工具')

        # 设置窗口状态为最大化
        self.root.state('zoomed')

        # 创建顶部的菜单栏
        self.mnu = tk.Menu(self.root)
        filemenu = tk.Menu(self.mnu, tearoff=0)
        self.mnu.add_cascade(label='文件', menu=filemenu)
        filemenu.add_command(label='打开图片', command=self.open_image)
        filemenu.add_command(label='去除水印', command=self.remove_watermark)
        filemenu.add_command(label='保存结果', command=self.save_image)

        help_menu = tk.Menu(self.mnu, tearoff=0)
        help_menu.add_command(label="关于程序", command=self.about_remove_watermark)
        help_menu.add_command(label="程序讲解", command=self.remove_watermark_help)
        help_menu.add_separator()
        help_menu.add_command(label="退出", command=self.window_close)
        self.mnu.add_cascade(label="帮助", menu=help_menu)

        # 放置菜单栏
        self.root.config(menu=self.mnu)

        # 显示图片信息,包括图片路径和图片尺寸
        self.info_frame = tk.Frame(self.root)
        self.info_frame.pack(fill="x")
        self.info_bar = tk.Label(self.info_frame, font=('宋体', 13))
        self.info_bar.pack()

        # 图像显示区域
        self.canvas = tk.Canvas(self.root, bg='#BCBCBC', cursor="cross")
        self.canvas.pack(fill=tk.BOTH, expand=True)

        # 底部按钮区域
        self.bottom_frame = tk.Frame(self.root)
        self.bottom_frame.pack(fill="x", side='bottom')

        self.button_frame = tk.Frame(self.bottom_frame)
        self.button_frame.pack()

        # 还原图像按键布置
        reset_button = tk.Button(self.button_frame,
                        text="还原图像",
                        cursor="hand2",
                        padx=10,
                        borderwidth=3,
                        background="#f0f0f0",
                        command=self.reset)
        reset_button.pack(side='right', padx=10, pady=10)
        reset_button.bind("<Enter>", lambda e: self.mouse_hover(reset_button, color='#a1e1ff'))
        reset_button.bind("<Leave>", lambda e: self.mouse_not_hover(reset_button, color='#f0f0f0'))

        # 保存结果按键布置
        save_button = tk.Button(self.button_frame,
                        text="保存结果",
                        cursor="hand2",
                        padx=10,
                        borderwidth=3,
                        background="#f0f0f0",
                        command=self.save_image)
        save_button.pack(side='right', padx=10, pady=10)
        save_button.bind("<Enter>", lambda e: self.mouse_hover(save_button, color='#a1e1ff'))
        save_button.bind("<Leave>", lambda e: self.mouse_not_hover(save_button, color='#f0f0f0'))

        # 去除水印按键布置
        remove_button = tk.Button(self.button_frame,
                        text="去除水印",
                        cursor="hand2",
                        padx=10,
                        borderwidth=3,
                        background="#f0f0f0",
                        command=self.remove_watermark)
        remove_button.pack(side='right', padx=10, pady=10)
        remove_button.bind("<Enter>", lambda e: self.mouse_hover(remove_button, color='#a1e1ff'))
        remove_button.bind("<Leave>", lambda e: self.mouse_not_hover(remove_button, color='#f0f0f0'))

        # 打开图片按键布置
        open_button = tk.Button(self.button_frame,
                        text="打开图片",
                        cursor="hand2",
                        padx=10,
                        borderwidth=3,
                        background="#f0f0f0",
                        command=self.open_image)
        open_button.pack(side='right', padx=10, pady=10)
        open_button.bind("<Enter>", lambda e: self.mouse_hover(open_button, color='#a1e1ff'))
        open_button.bind("<Leave>", lambda e: self.mouse_not_hover(open_button, color='#f0f0f0'))

        # 将窗口关闭事件与window_close函数关联
        self.root.protocol("WM_DELETE_WINDOW", self.window_close)

        # 鼠标事件绑定
        self.canvas.bind("<ButtonPress-1>", self.start_selection)
        self.canvas.bind("<B1-Motion>", self.update_selection)
        self.canvas.bind("<ButtonRelease-1>", self.end_selection)

        self.original_file_path = None  # 初始化变量

        self.root.bind("<Configure>", self.on_configure)  # 窗口大小改变事件绑定

        self.root.mainloop() # 开启主循环,让窗口处于显示状态

    # 当鼠标悬停在按钮上
    def mouse_hover(self, button, color=None):
        if not color:
            color = '#a1e1ff'
        button.configure(bg=color)

    # 当鼠标未悬停在按钮上
    def mouse_not_hover(self, button, color=None):
                if not color:
                    color = 'white'
                button.configure(bg=color)

    # 打开图片
    def open_image(self):
        self.open_path = filedialog.askopenfilename(filetypes=[("图像文件", "*.jpg *.jpeg *.png *.bmp")])
        if not self.open_path:
            return
        try:
            self.original_image = Image.open(self.open_path)
            # 检查图像模式,如果是透明背景,则转换为白色背景
            if self.original_image.mode == 'RGBA':
                # 转换图像模式为RGB,并添加白色背景
                background = Image.new('RGB', self.original_image.size, (255, 255, 255))
                # 使用透明度通道作为蒙版
                background.paste(self.original_image, mask=self.original_image.split()[-1])
                self.original_image = background
            self.original_file_path = self.open_path  # 保存原始路径
            self.removed_image = None
            self.size = self.original_image.size
            self.show_image(self.original_image)
            self.mask = None
        except Exception as e:
            messagebox.showerror("错误", f"无法打开图片:\n{str(e)}")

    # 显示图像
    def show_image(self, image):
        self.info_bar.configure(text=f'图片信息 | {self.original_file_path}【尺寸:{self.size[0]}x{self.size[1]}】')
        # 计算缩放比例
        canvas_width = self.canvas.winfo_width()
        canvas_height = self.canvas.winfo_height()
        image_width, image_height = image.size

        self.display_ratio = min(
            canvas_width / image_width,
            canvas_height / image_height,
            1.0  # 最大保持原始尺寸
        )

        display_size = (
            int(image_width * self.display_ratio),
            int(image_height * self.display_ratio)
        )

        # 缩放并显示图像
        if hasattr(Image, 'Resampling'):
            get_method_again = Image.Resampling.LANCZOS
        else:
            get_method_again = Image.LANCZOS  # 旧版本回退

        self.image_x_co, self.image_y_co = (self.root.winfo_screenwidth() / 2) - image_width / 2, (
                self.max_height / 2) - image_height / 2

        display_image = image.resize(display_size, get_method_again)
        self.tk_image = ImageTk.PhotoImage(display_image)

        self.canvas.delete("all")
        self.canvas.config(
            width=display_size[0],
            height=display_size[1]
        )
        self.canvas.create_image(self.image_x_co, self.image_y_co, anchor=tk.NW, image=self.tk_image)

    # 鼠标开始选择
    def start_selection(self, event):
        self.rectangle_selection = (event.x, event.y, event.x, event.y)

    # 更新选择区域
    def update_selection(self, event):
        if self.rectangle_selection:
            x_0, y_0, _, _ = self.rectangle_selection
            x_1, y_1 = event.x, event.y
            self.rectangle_selection = (x_0, y_0, x_1, y_1)
            self.draw_rectangle()

    # 结束选择
    def end_selection(self, event):
        if self.rectangle_selection:
            self.draw_rectangle()
            # 转换到原始图像坐标
            x_0 = int(self.rectangle_selection[0] / self.display_ratio - self.image_x_co)
            y_0 = int(self.rectangle_selection[1] / self.display_ratio - self.image_y_co)
            x_1 = int(self.rectangle_selection[2] / self.display_ratio - self.image_x_co)
            y_1 = int(self.rectangle_selection[3] / self.display_ratio - self.image_y_co)

            # 创建掩膜
            self.mask = Image.new("L", self.original_image.size, 0)
            draw = ImageDraw.Draw(self.mask)
            draw.rectangle([x_0, y_0, x_1, y_1], fill=255)

    # 创建红色矩形虚线区域
    def draw_rectangle(self):
        self.canvas.delete("selection")
        x_0, y_0, x_1, y_1 = self.rectangle_selection
        self.canvas.create_rectangle(
            x_0, y_0, x_1, y_1,
            outline="red",
            tags="selection",
            dash=(4, 2)
        )

    # 定义还原方法
    def reset(self):
        if not self.original_image:
            messagebox.showwarning("警告", "请先打开图片")
            return
        else:
            try:
                self.original_file_path = self.open_path  # 保存原始路径
                self.removed_image = None
                self.size = self.original_image.size
                self.show_image(self.original_image)
                self.mask = None
            except Exception as e:
                messagebox.showerror("错误", f"无法打开图片:\n{str(e)}")

    # 定义去除水印方法
    def remove_watermark(self):
        if not self.original_image:
            messagebox.showwarning("警告", "请先打开图片")
            return
        if not self.mask:
            messagebox.showwarning("警告", "请先选择水印区域")
            return

        try:
            # 转换图像格式
            transform_image = cv2.cvtColor(np.array(self.original_image), cv2.COLOR_RGB2BGR)
            mask = np.array(self.mask)

            # 使用OpenCV的inpaint图像修复方法,智能算法填充图像中的指定区域
            radius = 10
            result = cv2.inpaint(transform_image, mask, radius, cv2.INPAINT_TELEA)

            # 将numpy数组还原为PIL图像
            self.removed_image = Image.fromarray(cv2.cvtColor(result, cv2.COLOR_BGR2RGB))
            self.show_image(self.removed_image)
        except Exception as e:
            messagebox.showerror("错误", f"处理失败:\n{str(e)}")

    # 定义保存图像方法
    def save_image(self):
        if not self.removed_image:
            messagebox.showwarning("警告", "没有可保存的结果")
            return

        if not self.original_file_path:
            messagebox.showwarning("警告", "未找到原始文件信息")
            return

        # 生成默认文件名
        original_name = path.basename(self.original_file_path)
        default_name = f"NEW_{original_name}"

        save_path = filedialog.asksaveasfilename(
            defaultextension=".jpg",
            filetypes=[("JPEG格式", "*.jpg"), ("PNG格式", "*.png"), ("BMP格式", "*.bmp")],
            initialfile=default_name  # 设置默认文件名
        )

        if save_path:
            try:
                self.removed_image.save(save_path, quality=95)
                messagebox.showinfo("成功", "图片保存成功")
            except Exception as e:
                messagebox.showerror("错误", f"保存失败:\n{str(e)}")

    # 关于去除图片水印工具
    def about_remove_watermark(self):
        about = tk.Tk()
        about.title('关于去除图片水印工具')

        # 设置窗口居中
        window_width = 850
        window_height = 520
        screen_width = about.winfo_screenwidth()
        screen_height = about.winfo_screenheight()
        x = (screen_width - window_width) / 2
        y = (screen_height - window_height) / 2
        about.geometry('%dx%d+%d+%d' % (window_width, window_height, x, y))
        about.resizable(width=False, height=False)

        about_frame = tk.Frame(about, width=850, height=520)
        about_frame.pack()
        tk.Label(about_frame, text='去除图片水印工具', font=("宋体", 16)).place(x=330, y=20)
        tk.Label(about_frame, text='使用编程语言:Python', font=("宋体", 14)).place(x=50, y=90)
        tk.Label(about_frame, text='打开图像:支持打开后缀名为jpg、jpeg、png、bmp的图像', font=("宋体", 14)).place(x=50, y=150)
        tk.Label(about_frame, text='选取水印位置:拖动鼠标选择指定的水印区域', font=("宋体", 14)).place(x=50, y=210)
        tk.Label(about_frame, text='填充水印区域:通过智能算法填充图像中的指定区域', font=("宋体", 14)).place(x=50, y=270)
        tk.Label(about_frame, text='保存图像:可以将图像保存为jpg、png或bmp后缀名的图像文件', font=("宋体", 14)).place(x=50, y=330)
        tk.Label(about_frame, text='注意:如果处理的图像是带有透明通道的PNG格式,程序会自动将透明背景转换成白色背景', font=("宋体", 14)).place(x=50, y=390)
        tk.Label(about_frame, text='创作者:www.pyhint.com', font=("宋体", 14)).place(x=50, y=450)
        about.mainloop()

    # 去除图片水印工具讲解页面
    def remove_watermark_help(self):
        webbrowser.open("https://www.pyhint.com/article/166.html")

    # 点击关闭窗口触发函数
    def window_close(self):
        # 弹出确认对话框
        if messagebox.askokcancel("退出", "你确定要退出吗?"):
            # 点击确定后关闭窗口
            self.root.destroy()

    # 限制窗口只能最大化显示
    def on_configure(self, event):
        if self.root.state() != 'zoomed':  # 判断如果不是最大化状态
            self.root.state('zoomed')  # 恢复到最大化状态

# 当前模块直接被执行
if __name__ == "__main__":
    # 创建主窗口
    app = RemoveWatermark()
